The WD3 crowd have been trading pictures of their respective games rooms so I thought I would also share some pics here. This is my little oasis and weekly battle ground.
Saturday, 24 July 2010
Games Room
The WD3 crowd have been trading pictures of their respective games rooms so I thought I would also share some pics here. This is my little oasis and weekly battle ground.
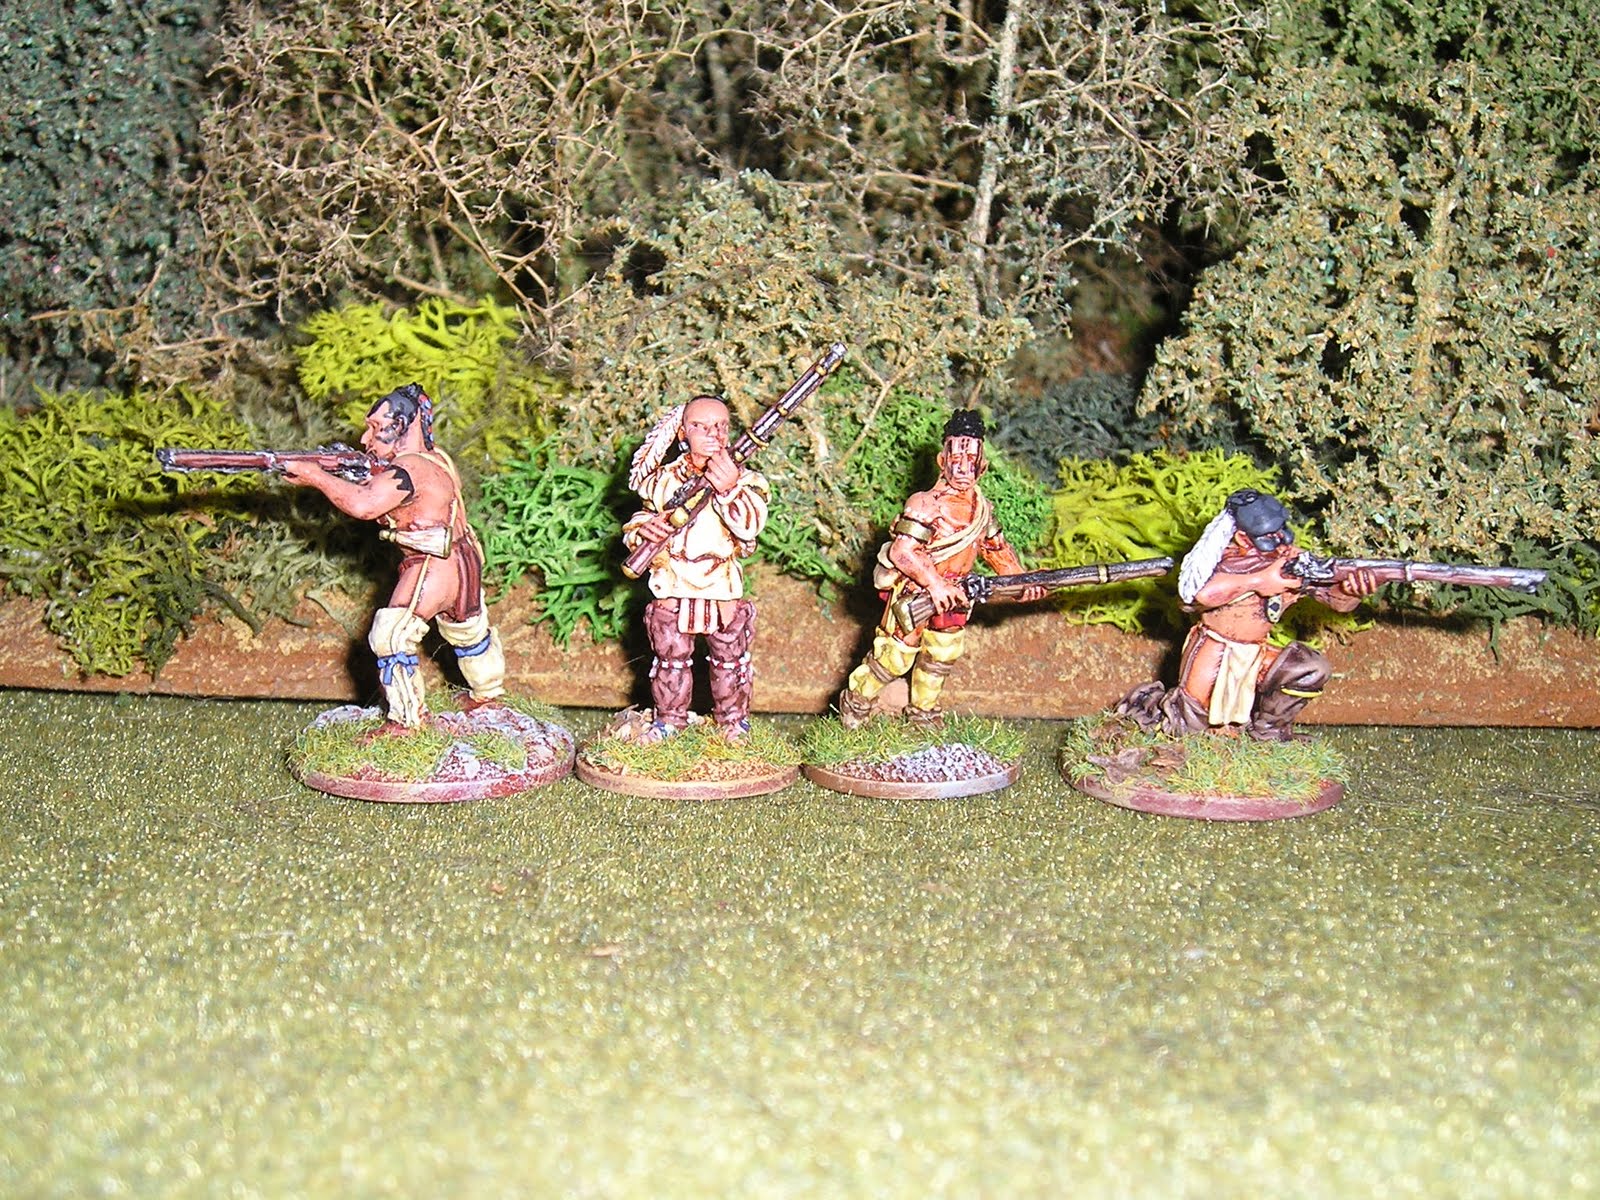
Redoubt Indians
http://www.redoubtenterprises.com/
Labels:
French and Indian War
Perry Woodland Indians
Labels:
French and Indian War
Last of the Mohicans
I think most people are aware of the site where I downloaded the rules from but if you aren't, here is a link http://www.freewargamesrules.co.uk/
Its a great resource for free rules which you can try at no monetary risk. Here is a link to the Last of the Mohican rules http://homepages.paradise.net.nz/skarlet/mohicans/mohicans_rules.htm
Now, I do like this very simple set of rules but I will give you a word of warning. Hawkeye is indeed dead eye dick and Chingachgook will have you on the butchers slab before you can say pound of mince please. Knowing this, you can see that you're probably going to want a fair few baddies to take them on.
I have also taken the core rules and amended them slightly for general skirmish games in North America and they seem to work very well.
The figures pictured are painted by myself and are available from Conquest Miniatures http://www.conquestminiatures.com/ and you can also get a set from Redoubt Enterprises http://www.redoubtenterprises.com/ although, I have to say that I prefer the Conquest figures.
Labels:
French and Indian War
Friday, 23 July 2010
Lexington Belfry
This is the belfry which stood at Lexington. I believe this particular one (the original) burnt down and there is now a replacement there.
I don't do AWI skirmishing but I just fancied building this with the view that it could fit in with other North American skirmish games that I do do.
The first step was to come up with the correct proportions and establish a 'footprint' so that I could make an appropriate sized base to begin construction. I just came up with something which looked right to me rather than using any sort of mathematical formula. Having done this, I drew a rectangle on the base and then glued the uprights on all four corners in their places. Next step was to cut and glue the cross pieces and then the door way. I find that super glue is best for this as it sticks straight away, unlike pva.
The clapboard can now be fitted starting from the bottom with each successive piece overlapping the one under it slightly. Make sure that the width of each piece is the same with as between each upright. You can tackle this one side at a time. When finished, you should have gaps between each side running up the corners of the building. You now cut a single piece of balsa to fit into this gap making a clean, finished corner. You can also put the door in at this time.
I then made the bell tower construction. I made the bell from a solid piece of Milliput but you might find that you can buy an actual bell to serve the same purpose. I looked but couldn't find one. Remember to paint the inside of the building and also the whole bell tower before you glue in place as you will be able to see into the building when the construction is complete.This done, you can glue in place the roof supports coming into the bell tower from each corner of the building. Now cut strips of roofing material and apply the same way you did the clap boarding to the side of the building. The only difference is that these need to but up to each other with no gap between them so you will need to do a layer at a time all the way around the roof from the bottom up.

The final part of the roof can now be sorted. You need a roof support coming from each corner of the top part of the belfry each meeting in the middle to form a peak. You can then apply the roofing timbers much the same as you did with the main roof section.

The final part of the roof can now be sorted. You need a roof support coming from each corner of the top part of the belfry each meeting in the middle to form a peak. You can then apply the roofing timbers much the same as you did with the main roof section.
Now add some details to the door like hinges, latches etc. I used plasticard but you can use whatever you deem best.
Last but not least, paint and base. I painted the building brown and then gave it a black ink wash which, when dry was dry brushed with an ochre colour. Metal work was picked out in black. For basing, I use brown emulsion with sand mixed in which is then dry brushed with a sand colour and flock and leaf litter added.Et voila!
If you don't fancy building one, you can also buy one from Grand Manner.

Labels:
25mm buildings
18th century house
The building wasn't cheap but it is very nice and the lift off roof allows for figures to be placed inside which saves on record keeping.
I made the fencing from balsa.
Labels:
25mm buildings
Thursday, 22 July 2010
19th Light Dragoons
There were only two British cavalry Regiments to serve in North America during the War of 1812 and it is this unit, the 19th which saw the most action. This unit saw action at the re-capture of Fort George, Black Rock and Buffalo, Chippawa, Lundy's Lane and the siege of Fort Erie. A contingent also saw action at a skirmish at Molcolm's Mill chasing off American raiders. Another squadron which was stationed in Montreal also saw action at Plattsburgh.
As the Regiment was sent to North America in 1812 during the uniform change, I chose to portray them in the Tarleton rather than the new shako as I prefer the Tarleton.
The figures are from Front Rank http://www.frontrank.com/ and the standard is hand painted by myself.
Labels:
War of 1812
22nd US Infantry
This Regiment saw action at Chippawa and Lundy's Lane. Their nickname, "Regulars, by God" came during the War of 1812 from the Battle of Chippewa on 5 July 1814. The uniform of the Infantry was normally blue, however, due to shortages of blue cloth the troops under the command of General Winfield Scott were issued short jackets of gray cloth which they wore into the battle. At first , the British mistook the regulars for militia. But when Scott's brigade of regiments advanced without wavering through a hail of artillery and musket fire, the British commander Major General Phineas Riall realized his mistake and cried, "Those are Regulars, By God!."Figures are from Old Glory http://www.oldgloryminiatures.com/ and the standards are hand painted by myself.
Labels:
War of 1812
1st Royal Scots War of 1812
These are the 1st Royal Scots who saw action at Sackett's Harbour, Buffalo and Black Rock, Fort Niagara, Longwoods, Chippewa, Lundy's Lane, the siege of Fort Erie and Cook's Mill.The figures are from Front Rank http://www.frontrank.com/ and the standards are hand painted by myself.
Labels:
War of 1812
Peter Pig AWI rules
Pre game set up. First of all, there is the pre game set up. Anyone familiar with their Wars of the Roses 'Bloody Barrons' rules will be familiar with this.
Each side is given a set number of dice which they divide up, as they wish, into several catagories i.e. extra ammo, scouting, etc etc. When this is done, both sides then roll the number of dice which they have assigned to the appropriate catagory and any 5's or 6's (might just be 6's) count. Who ever gets the most wins that part. So if you get the most for extra ammo, say, then you get the extra ammo. You get the idea.
The attacker and defender both pick several small pieces of terrain according to their list and the defender then deploys these. The board is divided into something like 6 sections and each section must have at least 2 pieces of terrain either wholey or entirely in the section. Once this is done, the attacker gets the chance to modify this to a certain extent.
In some games, the defender will then place objective markers on the table in places which he would like to defend. Four markers are placed and the attacker gets to remove one of these. These add to the points system at the end of the game to see who has won. The deeper an objective is into enemy territory means that it is worth more points if captured.
OK, now the armies are deployed and the game begins.
The game has a command and control system. An army commander, and his subbordinates have command values according to their ability. The C-in-C decides where he would most like to exhert his influence by picking a commander in that area. There is a dice roll which is modified by his and the subbordinate in questions command ratings. This will result in how many extra dice that subbordinate gets to spend. i.e. re-rolls.
We then get down to the activation of units. This is basically a PIPs system. A commander will roll a dice to try and activate a unit. If the commander is poor quality, he is less likely to be able to activate anything. If you fail to activate a unit, your turn is over. Once activated a unit rolls to see how many PIPs it gets. If you are using a commander who has been given extra dice by the C-in-C and you don't get a roll you liked i.e. not enough PIP's of a bad saving roll etc, you may elect to use those extra dice to dice again. You may move, shoot, charge etc according to the number of PIP's you have. If an active unit comes within close range of a non active unit, that unit is allowed opportunity fire on the active unit.
To fire, you get as many dice as you have bases and then you need a certain number to hit on each dice with modifiers. The opposition then gets a saving throw for each hit.
Thats the basics of it and in my opinion, it works quite well. The pre game bit is a bit of a distraction for me and makes it really gamey to no advantage.
Those are my thoughts any way.
I'd be glad to hear what other people think if they have tried them.
http://www.peterpig.co.uk/range5-awi.htm
Each side is given a set number of dice which they divide up, as they wish, into several catagories i.e. extra ammo, scouting, etc etc. When this is done, both sides then roll the number of dice which they have assigned to the appropriate catagory and any 5's or 6's (might just be 6's) count. Who ever gets the most wins that part. So if you get the most for extra ammo, say, then you get the extra ammo. You get the idea.
The attacker and defender both pick several small pieces of terrain according to their list and the defender then deploys these. The board is divided into something like 6 sections and each section must have at least 2 pieces of terrain either wholey or entirely in the section. Once this is done, the attacker gets the chance to modify this to a certain extent.
In some games, the defender will then place objective markers on the table in places which he would like to defend. Four markers are placed and the attacker gets to remove one of these. These add to the points system at the end of the game to see who has won. The deeper an objective is into enemy territory means that it is worth more points if captured.
OK, now the armies are deployed and the game begins.
The game has a command and control system. An army commander, and his subbordinates have command values according to their ability. The C-in-C decides where he would most like to exhert his influence by picking a commander in that area. There is a dice roll which is modified by his and the subbordinate in questions command ratings. This will result in how many extra dice that subbordinate gets to spend. i.e. re-rolls.
We then get down to the activation of units. This is basically a PIPs system. A commander will roll a dice to try and activate a unit. If the commander is poor quality, he is less likely to be able to activate anything. If you fail to activate a unit, your turn is over. Once activated a unit rolls to see how many PIPs it gets. If you are using a commander who has been given extra dice by the C-in-C and you don't get a roll you liked i.e. not enough PIP's of a bad saving roll etc, you may elect to use those extra dice to dice again. You may move, shoot, charge etc according to the number of PIP's you have. If an active unit comes within close range of a non active unit, that unit is allowed opportunity fire on the active unit.
To fire, you get as many dice as you have bases and then you need a certain number to hit on each dice with modifiers. The opposition then gets a saving throw for each hit.
Thats the basics of it and in my opinion, it works quite well. The pre game bit is a bit of a distraction for me and makes it really gamey to no advantage.
Those are my thoughts any way.
I'd be glad to hear what other people think if they have tried them.
http://www.peterpig.co.uk/range5-awi.htm
Labels:
Wargaming the AWI
Subscribe to:
Posts (Atom)